Galvanized Steel Pipes in LA: When to Repair vs. When to Repipe
If your Hollywood, Silver Lake, or Pasadena home was built before 1970, there's a 78% chance galvanized steel is still in your walls. Here's how to know when it's salvageable, when it isn't, and what LA's water chemistry does to 60-year-old steel.
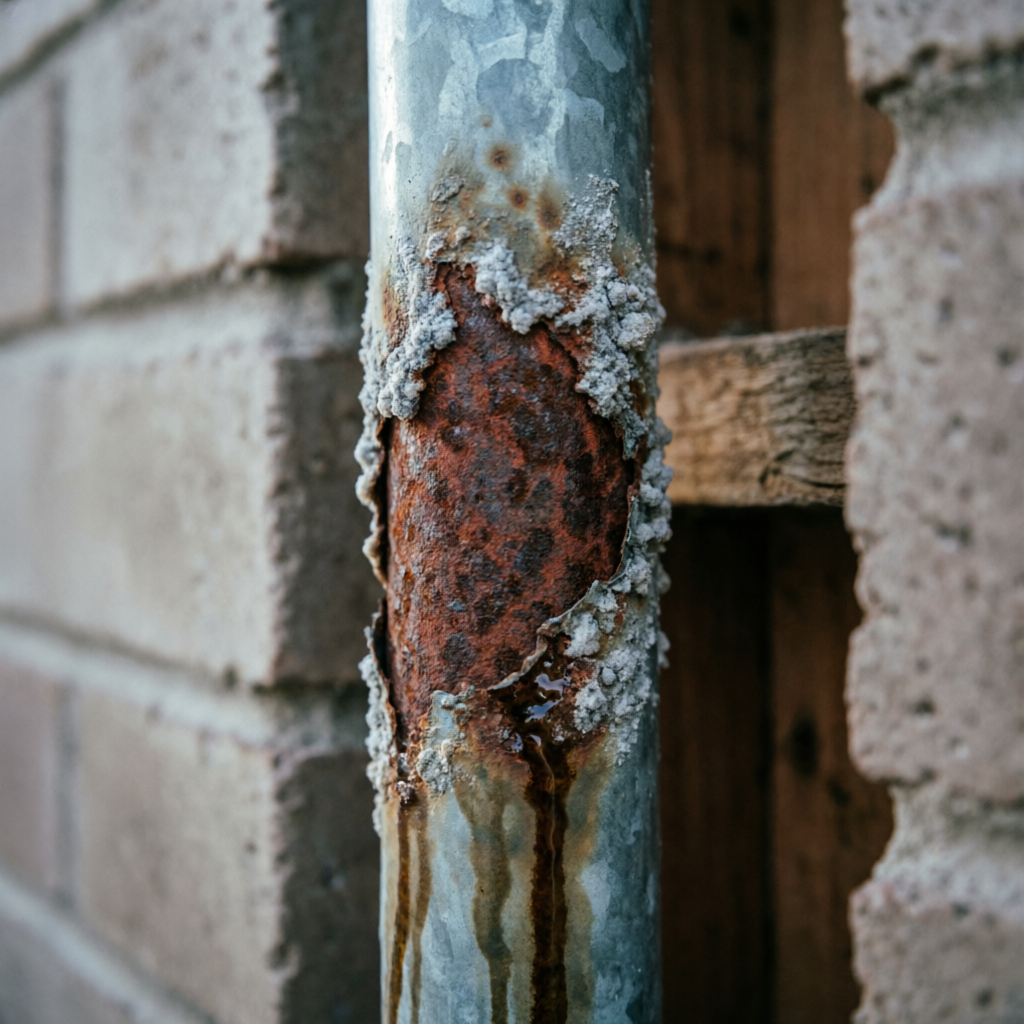
Every week, my technicians walk into a pre-1970 Los Angeles bungalow and find the same thing: gray steel pipes running through walls, under slabs, and across attic spaces — pipes that were installed when Eisenhower was president and have been quietly corroding from the inside ever since.
Galvanized steel was the standard residential water supply material from roughly 1930 to 1970. In Los Angeles alone, an estimated 220,000 homes were plumbed with galvanized steel during the post-war building boom — concentrated in Hollywood, Silver Lake, Echo Park, Los Feliz, Pasadena, and much of the San Fernando Valley.
Today, those pipes are at or past the end of their engineered lifespan. The zinc coating that once protected the steel has long since dissolved, and the bare steel underneath is rusting from the inside out — slowly restricting flow, releasing rust into your drinking water, and building toward catastrophic failures that flood walls and floors. After 22 years of repiping LA homes, I've learned there's a right time to repair a galvanized system and a right time to replace it. This guide is how to tell the difference.
What galvanized steel pipe actually is
Galvanized steel pipe is regular steel pipe coated with a layer of zinc to slow corrosion. The zinc acts as a sacrificial barrier — it corrodes before the steel does, extending the pipe's life. When new, galvanized pipe has a shiny silver-gray finish that dulls to matte gray within a few years.
The engineered lifespan of galvanized water supply pipe is 40–60 years, depending on water chemistry, water pressure, and installation quality. That puts the vast majority of LA's galvanized plumbing well past the end of its intended service life.
Here's what happens as galvanized ages:
- Years 0–20: Zinc coating intact, minimal internal corrosion, full flow capacity.
- Years 20–40: Zinc begins dissolving at joints and high-flow points (near fixtures, at bends). Internal rust nodules start forming, reducing effective diameter by 10–20%.
- Years 40–60: Zinc largely gone. Bare steel exposed to water. Heavy rust and mineral scale buildup — internal diameter reduced 30–60%. Low flow at fixtures becomes noticeable.
- Years 60+: Rust nodules merge into near-solid obstructions. Pinhole leaks appear. Joint failures accelerate. The system is failing — the only question is how fast.
How to identify galvanized steel in your home
Find an exposed pipe (under a sink, at the water heater, in the garage or crawlspace) and check these characteristics:
- Color: Dull matte gray when new; brown, rust-streaked, or chalky white when old
- Magnet test: A magnet sticks strongly (confirms steel — copper and PEX are non-magnetic)
- Scratch test: A penny scratched across the surface reveals silver-gray metal under surface rust (copper reveals copper-orange)
- Joint style: Threaded fittings (screwed together) rather than soldered (copper) or crimped (PEX)
- Pipe size: Typically ½" or ¾" nominal — larger outer diameter than same-nominal copper
If you're uncertain, we'll identify the material for free during any diagnostic visit.
Six warning signs your galvanized is failing
1. Low water pressure at multiple fixtures
The most common and most reliable indicator. As rust and scale build up inside galvanized pipe, the effective internal diameter shrinks. A ½" galvanized pipe that once delivered 7 GPM might deliver 2 GPM after 50 years. The key diagnostic: if pressure is low at multiple fixtures (not just one), the restriction is in the supply system — almost always the galvanized pipes themselves.
Test it: run the bathtub cold faucet full open and time how long it takes to fill a 5-gallon bucket. A healthy ½" supply line fills it in 30–45 seconds. A failing galvanized line can take 2+ minutes.
2. Brown, orange, or rust-flecked water
Rust-colored water from the hot or cold tap — particularly after the water has been sitting overnight or after a main shutoff — means the pipe interior is actively corroding. Run the water for 60 seconds; if it clears, the rust is in your pipes (not the water heater). If it doesn't clear after 2 minutes, you may have a municipal water issue (rare) or a severe internal failure.
This is the single most visible sign homeowners notice, and it's the one that usually prompts the phone call. It's also a sign that replacement is urgent — rust-laden water isn't safe to drink regularly.
3. Frequent leaks at joints or along pipe runs
Galvanized fails in two ways: pinhole leaks along pipe runs where wall thickness has thinned to near-zero, and joint failures where threaded fittings corrode and separate. One leak is often a warning; two leaks within a year is a system failure in progress.
The economics change dramatically after the second leak. Usually signals that patching is futile — any spot repair is likely to be followed by another failure within months. This is where we typically shift from "repair" to "repipe" recommendations.
4. Visible external corrosion
Inspect any exposed galvanized pipe (under sinks, at the water heater, in the crawlspace). Signs of active failure include:
- Bulging or "pimpled" spots on the pipe surface (rust nodules pushing outward)
- Flaking zinc or rust scale falling off the exterior
- White chalky deposits at joints (zinc oxide corrosion byproduct)
- Green or blue-green staining near fittings (indicating copper-to-galvanized dielectric corrosion at transition points)
5. Water heater sediment buildup
Galvanized supply lines feeding a tank water heater shed rust particles continuously. That rust accumulates at the bottom of the tank, accelerating sediment buildup and shortening water heater life. If your tank water heater needs flushing every 6 months rather than annually, galvanized supply lines are a likely cause.
6. Strange taste or metallic smell
Iron from corroding galvanized pipes gives water a distinct metallic taste and sometimes a rusty smell. Most homeowners notice this in coffee, tea, or when drinking cold water straight from the tap. It's not typically a health emergency, but it's a quality-of-life issue that signals active internal corrosion.
I've cut open galvanized pipes that were originally ½" inside diameter and found them reduced to the size of a pencil lead. Water was still flowing — barely. The homeowners had been living with 2 GPM at every fixture for years and assumed that was normal. Marcus Chen, Founder · Pacific Line Plumbing
Where galvanized still lives in Los Angeles
Not every pre-1970 LA home has galvanized — many have been repiped in copper or PEX over the decades. But based on our service history, these neighborhoods have the highest concentration of homes still on original galvanized:
| Neighborhood | Era built | % on galvanized |
|---|---|---|
| Silver Lake | 1920s–1950s bungalows | 72% |
| Echo Park | 1920s–1940s craftsman | 68% |
| Hollywood (north of Sunset) | 1930s–1950s | 64% |
| Los Feliz | 1920s–1950s Spanish | 61% |
| Pasadena (Bungalow Heaven) | 1910s–1940s craftsman | 58% |
| Long Beach (Naples, Belmont) | 1930s–1950s | 49% |
| San Fernando Valley tract homes | 1950s–1965 | 44% |
| Glendale hillside homes | 1940s–1960s | 41% |
Post-1970 construction in LA switched overwhelmingly to copper, which has its own failure modes (see our slab leak guide) but doesn't share galvanized's progressive internal obstruction.
Why LA's galvanized fails faster than other cities
Los Angeles galvanized pipe fails faster than similar pipe in soft-water cities like Seattle or Portland because of three LA-specific factors:
- Moderately hard water (120–160 ppm). LADWP water is hard enough to deposit calcium carbonate scale on the pipe interior, accelerating the obstruction process on top of the iron rust.
- Chloramine disinfection. LADWP switched from chlorine to chloramine in the 2000s. Chloramine is more aggressive toward the zinc coating and the steel underneath, accelerating corrosion.
- Reactive clay soil. LA's clay soil holds moisture and salts against exterior pipe surfaces, accelerating outside-in corrosion on buried galvanized runs (particularly between the water meter and the house).
Health and insurance risks
Lead in the water
This is the one homeowners ask about most, and the answer is more nuanced than headlines suggest. Galvanized pipe itself doesn't contain lead — but the zinc coating applied before 1986 often contained trace lead (0.1–0.8% by weight), and galvanized fittings from that era were frequently brass with up to 8% lead content.
As the zinc corrodes, that lead can be released into water — particularly in the first-draw water after water has been sitting in the pipes overnight. Testing by LADWP and independent labs has shown that homes with galvanized plumbing can exceed the EPA's 15 ppb action level for lead in first-draw samples.
The practical recommendation: if your home has galvanized plumbing, run the cold tap for 30–60 seconds before using it for drinking or cooking (especially in the morning), use only cold water for cooking and infant formula, and consider an NSF-53 certified lead-removing filter at the kitchen tap until the repipe is done.
Homeowner's insurance
Many California homeowner's insurance policies have begun adding polybutylene and galvanized exclusions in the past decade. If your home still has galvanized plumbing, you may find:
- Higher premiums (20–40% more than a copper or PEX-plumbed home)
- Exclusions for water damage from galvanized pipe failures
- Required repipe as a condition of policy renewal
- Difficulty obtaining coverage from some carriers
Before your next renewal, call your agent and ask specifically: "Is my galvanized plumbing covered for water damage, or is there an exclusion?" If there's an exclusion, a proactive repipe usually pays for itself within 3–5 years of premium savings — and eliminates the exclusion entirely.
Home sale complications
Galvanized plumbing is a standard line item on California home inspection reports. Most buyer's agents will negotiate a credit for a home with original galvanized, and some buyers will walk away entirely. A repipe done before listing removes the negotiating leverage entirely and often adds to perceived home value.
How we inspect galvanized plumbing
A proper galvanized inspection goes beyond a visual walk-through. Here's the protocol our technicians follow on every pre-1970 LA home:
1. Static pressure test
We connect a pressure gauge at the hose bib and measure the home's static water pressure. Healthy supply lines hold steady pressure; restricted galvanized lines show pressure drop when fixtures are opened. We also check for LADWP's incoming pressure — which can spike to 120+ PSI in hillside areas and accelerate galvanized failure.
2. Flow rate measurement
We time-fill a 5-gallon bucket at multiple fixtures (bathtub, kitchen sink, outdoor hose bib) to quantify flow restriction. This tells us whether the restriction is systemic (all galvanized lines) or localized (one branch).
3. Visual inspection of exposed pipe
Every exposed section of galvanized — under sinks, at the water heater, in crawlspace, at the main shutoff — is documented for corrosion severity, joint condition, and any active weeping.
4. Water quality test
We collect a first-draw cold water sample and test on-site for iron, pH, hardness, and (if requested) lead. This quantifies the internal corrosion and helps determine if the pipe is salvageable.
5. Endoscope inspection
For borderline cases, we use a 6mm borescope to look inside the pipe through an accessible joint. This shows us directly whether the internal diameter is 80%, 50%, or 20% of original — the single best predictor of remaining life.
The result is a written inspection report with photos, test results, and a clear recommendation: maintain, repair, or repipe. There's no charge for the inspection if you proceed with any recommended work.
Repair vs. repipe: our decision framework
Repair is appropriate when:
- The home has had only one leak in the past 5 years
- Flow rates are acceptable (5+ GPM at bathtub)
- Water quality tests show low iron and lead
- Visual inspection shows the majority of pipe is intact
- The homeowner plans to sell within 3 years (won't recoup repipe cost)
- Budget constraints make repipe impossible in the near term
A targeted repair — replacing a single failed section with PEX-A or copper. It buys time, but doesn't extend the life of the rest of the system.
Repipe is appropriate when:
- The home has had 2+ leaks in the past 3 years
- Flow rates are below 3 GPM at multiple fixtures
- Water tests show elevated iron or lead
- Visible corrosion is widespread across exposed sections
- The home was built before 1955 (pipe is now 70+ years old)
- The homeowner plans to stay 5+ years
- Insurance requires repipe or has excluded galvanized damage
- The home is being prepared for sale and inspection will flag it
After 800+ repipes, here's the honest truth: most LA homeowners with pre-1965 galvanized plumbing should repipe. The pipe has outlived its engineered lifespan, the water chemistry is actively accelerating failure, and the cost of a proactive repipe is almost always less than the cost of waiting for a catastrophic failure.
For the full PEX vs. copper decision framework — including the specific situations where we still spec copper — see our PEX vs. copper repiping guide.
LA has a cottage industry of "galvanized specialists" who are actually sales companies that subcontract the work and charge 3–5× our pricing. Always verify: (1) the quote is from the CSLB-licensed company doing the work, (2) the technicians are W-2 employees not subcontractors, and (3) the quote is flat-rate, not "we'll know more once we open the wall."
Frequently asked questions
In short: no. There are companies that advertise "pipe descaling" or "epoxy pipe lining" for galvanized systems, but neither addresses the underlying problem. The zinc coating is gone, the steel is rusting, and the rust is progressive — no amount of cleaning stops the corrosion. Epoxy lining can temporarily seal small leaks, but it doesn't restore flow in obstructed sections and doesn't stop ongoing corrosion at joints and fittings. After 22 years, we've never seen a galvanized system restored to reliable service by cleaning or lining. The only permanent fix is replacement.
The water itself is usually safe, but there are caveats. Galvanized pipes can release iron (which causes staining and taste issues but isn't toxic) and small amounts of lead from the zinc coating and brass fittings used in pre-1986 construction. If your home has galvanized plumbing, run the cold tap for 30–60 seconds before drinking or cooking, use only cold water for cooking and infant formula, and consider an NSF-53 certified lead-removing filter at the kitchen tap. For the long term, repiping eliminates these concerns entirely.
Technically yes, but we don't recommend it unless there's a specific reason. Partial repipes create dielectric corrosion at the transition point between new copper/PEX and old galvanized — the two metals (or metal-to-plastic) react electrochemically and the galvanized corrodes faster at the junction. If you're repiping any significant portion, we recommend doing the whole system to avoid creating new failure points. The only partial repipes we do are for budget-constrained homeowners who need to address an immediate leak and plan to complete the system within 12–18 months.
Some drywall access is required, but far less than most homeowners expect. PEX-A's flexibility lets us snake new lines through attic spaces, crawlspace, and wall cavities with only small (12"×12") access holes at key junction points. On a typical 2-bathroom LA bungalow, we make 8–12 access holes, most of which are in closets, behind appliances, or in other low-visibility areas. All access holes are patched with new drywall, taped, and sanded smooth — ready for paint. We don't paint (paint matching is highly variable), but we leave you with smooth, paint-ready surfaces.
A PEX-A repipe on a typical 2-bathroom LA bungalow takes 2–3 days. A copper repipe on the same home takes 4–6 days. Water is shut off during work hours (typically 8am–5pm) and restored each evening so you can use the kitchen and bathrooms overnight. Most homeowners stay in the home during the work. We protect floors and furniture, and haul away all debris including the old galvanized pipe (which we recycle as scrap metal).
Yes. Every whole-home repipe in Los Angeles requires an LADBS plumbing permit. The permit ensures the work is inspected for code compliance — which matters for your homeowner's insurance, your future home sale, and your own safety. Pacific Line handles all permit applications, scheduling, and inspection coordination as part of our quoted price. Any plumber who offers to "skip the permit" is asking you to take on liability — walk away.
Gas lines are a separate system and typically don't need replacement during a water repipe. Older galvanized gas lines (black iron or galvanized) are still code-compliant in most LA homes if they're intact and properly supported. However, if your home is in an earthquake-prone area and doesn't have a seismic gas shutoff valve, we strongly recommend adding one during the repipe. Our earthquake gas valve guide covers this in detail.
Let's find out what's really in your walls.
Book a free in-home inspection with a licensed technician. We'll identify your pipe material, test your water pressure and quality, and give you a written repair-or-repipe recommendation — no pressure, no sales pitch.
Marcus Chen
Founder of Pacific Line Plumbing and a third-generation Los Angeles plumber with 22 years of field experience. Marcus has led over 450 galvanized repipes across pre-1970 LA neighborhoods and is a vocal advocate for proactive plumbing maintenance in historic housing stock. He lives in a 1948 Silver Lake bungalow — which he repiped with PEX-A on day one.
Keep reading
PEX vs. Copper Repiping: The California Homeowner's Decision Guide
After 800+ repipes, here's when each material wins — with real 2026 pricing and LA-specific considerations.
The Complete Guide to Slab Leak Detection in Los Angeles Homes
Post-war LA bungalows hide aging copper under concrete. Here's how electronic detection pinpoints leaks.
The True Cost of Plumbing Services in Los Angeles (2026)
We publish our exact pricing. Service-by-service breakdown with LA-specific factors that affect your final bill.